Extending HTML mode
You can add new HTML elements, or new attributes to existing elements, to
HTML mode. New elements will be put in a new submenu of the HTML menu. The possibility to extend HTML
mode was originally developed when HTML was continuously evolving with
Netscape and Microsoft adding new extensions to HTML. It provided a way for
you to add these new elements before HTML mode was updated. Now when HTML
has stabilized the main reason for the extendability is for the user to be able
to add elements of scripting languages, which use tags which look like HTML
tags. With XML in mind, this interface will be useful when Alpha gets XML
support. No promise that it will ever happen!
Your custom elements will always be available, regardless of the document
type declaration in the document or the attribute preferences. It is
assumed that you add new element because you want to use them... However,
when validating the document all custom elements are considered as unknown.
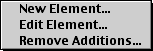
The menu has three functions:
- New Element to add a new element
- Edit Element to add new attributes to an existing HTML
element, or one you have previously added.
- Remove Additions to delete a new element or
to remove the new attributes you have added to an existing element.
Adding a new element

When adding a new element a dialog box is first opened where you can
specify:
- The name of the element.
- If the element has a closing tag or not. (Applies only if the type below
is "Normal".)
- The type of the element. There are three available types:
- Normal. This is the option you would normally use.
- A new type of INPUT element. This option is here for technical and
historical reasons. In the menu the INPUT
element is available for each value of the TYPE attribute. This because
the other attributes vary depending on the value of the TYPE attribute.
Here you can add another variant of the INPUT element, and in this case
you give the value of the TYPE attribute as the element name.
- A plug-in using EMBED. Most plug-ins have their own specific
attributes. Here you add a new EMBED element with all these attributes.
By default all attributes of the generic EMBED element are added.
Next you are asked to give a key binding for the new element. This dialog
box is the same as is used when changing key bindings in the menus.
Thereafter you are asked to specify the layout for the element. This is
done in the way explained in the section about element layout.
Next a window is opened where you can specify the attributes. This is
explained in the next subsection.
Editing an element
When you are adding a new element or editing an existing one a window is
opened where you can specify the attributes. Note! You
should not edit the text in this window directly, but only
through dialog boxes and the key shortcuts described below. Direct editing
has no effect, except possibly messing things up. There is
a reason that this window is made read-only.

Above is the edit window for the IMG element, where we have already
added a new attribute MYATTRIBUTE. Each attribute is given in this window
like this:
- First we have the attribute name - a bullet to the left of the name indicates that it is
provided by HTML mode and cannot be edited.
- Then comes the attribute type.
- The text "required" indicates that the attribute is required.
- For attributes of the type "Choices" all available choices are listed
below.
- For attributes taking numerical values the minimum and maximum allowed
value is given below.
Adding a new attribute

To add a new attribute type N. A dialog box is then opened
where you can specify:
- The attribute name.
- The attribute type.
- If the attribute is required.
The available types are:
- Flag Attributes which are flags and
don't take any value, like ISMAP for <IMG> or NOHREF for
<AREA>. These attributes will be checkboxes in the attribute dialog.
- URL Attributes which take a URL as
value, like HREF, SRC, etc.
- Color Attributes which take a color
as value.
- Frame target Attributes which take a
target window as value, like the attribute TARGET.
- Choices Attributes which can only
take certain predefined choices, such as ALIGN.
- Length Attributes which take an
integer or percentage value.
- Integer Attributes which take an
integer value.
- Other Attributes which do not fit into any
of the other categories or can take any value.
- Content type Attributes which take a content
type as value, like TYPE of STYLE.
- Content types Attributes which take a comma
separated list of content
types as value.
- Event handler Attributes which are
event handlers for JavaScript.
- Link types Attributes which take a space
separated list of link types as value, link REL and REV of LINK.
- Multi length Attributes which take a length
value or a value of the form 2*, like WIDTH of COL.
- Multi lengths Attributes which take a comma
separated list of multi length values, like COLS and ROWS of FRAMESET.
- Language code Attributes which take a
language code as value, like LANG.
- Character set Attributes which take a
character set as value, like CHARSET.
- Character sets Attributes which take a space
separated list of character sets as value, like ACCEPT-CHARSET of FORM.
- Lengths Attributes which take a comma separated
list of integer values, like COORDS of AREA.
- Date and time Attributes which take a date
and time value on ISO format, like DATETIME of INS and DEL.
- Character Attributes which take a single character
as value, like ACCESSKEY.
- Media descriptors Attributes which take a
comma separated list of media descriptors as value, like MEDIA of STYLE.
A few attribute types require additional information.
For attributes of the type Choices you must
specify all valid choices in a second dialog box. The choices you define
will be displayed in the dialog window as you go along, as shown below.
Click
- 'OK' for each choice
- 'No more choices' after you have clicked OK for the last
one.
- 'Remove last' to remove the last choice you just defined. You can
remove them all one after another to correct a mistake somewhere.


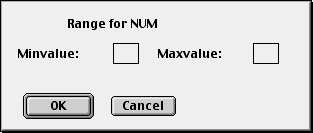
For attributes of the types Length,
Integer, Multi length,
Multi lengths, and Lengths
you must specify the range of valid values in a second dialog box.
Editing and deleting attributes
To edit an attribute to change its name, type, and values, browse to the
attribute and hit return. You can then give it values in the same way as
when you define a new attribute as described above. Note
that attributes marked with a bullet cannot be modified with one exception.
You can add new choices to an attribute of type Choices. Cmd-double-clicking
on an attribute also lets you edit it.
To delete an attribute browse to the attribute and type delete or backspace. You can
also select several lines and delete them all at once. Note
that attributes marked with a bullet cannot be deleted.
Saving
Once you are finished close the window to save your changes. To cancel the changes hold down the shift key while
clicking the window's close box.


